
There’s something about a greenhouse that gets people. Not just the practical side of it – the extended growing season, the tomatoes in October, the seedlings getting a head start in March – but something older than that. The idea of a sheltered place that you built with your own hands, where things grow because you made them the right conditions. It’s a small act of defiance against bad weather, short seasons, and grocery store prices that keep climbing.
Building your own greenhouse used to mean either paying a lot of money or settling for a flimsy pop-up structure that lasted two winters before the zipper broke. That’s changed. A greenhouse isn’t just about protecting plants – it’s about extending your growing season and creating a more controlled environment, and a DIY version can cost as little as $100 to $500, compared to $2,000 or more for store-bought kits. The range of designs people are building in their backyards right now – with reclaimed windows, PVC pipe, cedar planks, and old pallets – is genuinely impressive.
What follows is 19 of the best DIY greenhouse ideas worth trying this year, whether you have a sprawling yard, a narrow side patch, or just a deck and a dream. They’re organized loosely by difficulty and scale, so you can find the one that fits your space, your budget, and how adventurous you’re feeling with a power drill.
1. Classic A-Frame Greenhouse
The A-frame is the shape most people picture when they hear “greenhouse,” and there’s a reason it’s stuck around. The A-frame design offers increased height and superior ventilation compared to lean-to styles, which makes it one of the most versatile structures you can build from scratch. The steep roof angle also sheds rain efficiently, so you’re not dealing with pooling water or sagging panels after a heavy storm.
For a DIY A-frame, a cedar or pressure-treated timber frame paired with twin-wall polycarbonate panels is one of the most popular combinations right now. Twin-wall polycarbonate panels keep heat confined inside a greenhouse, making them an energy-efficient option – they ensure plants stay warm during cold spells and at night, resulting in improved harvests and shorter growing times. That matters more than people realize in shoulder seasons, when nights dip unexpectedly and you’re trying to keep seedlings alive.
A good beginner size is 8 by 10 feet. Typical widths range between 8 and 12 feet, and planning for one to two square feet of space per plant allows for healthy growth, while walkways should be at least three feet wide to allow comfortable movement. Start smaller than you think you need, because almost everyone who builds their first greenhouse immediately wishes they’d gone bigger – and a well-framed A-frame can be extended in length without rebuilding the whole thing.
2. PVC Hoop House
The hoop house is the gateway greenhouse – the design that gets people who thought they weren’t handy enough to build anything. A hoop-shaped PVC greenhouse is the most affordable option for DIY enthusiasts, light and simple to set up, and with only a handful of pipes and transparent plastic, you have a functional year-long greenhouse.
The basic method involves pushing PVC pipes into the ground (or securing them to wooden baseboards) at regular intervals, bending them into arches, and connecting the tops with a horizontal ridge pipe. Insert PVC pipes about two feet deep or secure them to wooden baseboards, bend opposite ends to form arches, connect the tops with a long piece of PVC for support, then use smaller pieces or wood strips to reinforce the frame – this helps hold up the covering during wind or snow.
Cover the whole structure with clear poly film or UV-resistant plastic sheeting and secure the edges with clips or by weighting them down with boards. Poly film carries an R-value of around 0.8, so it won’t keep heat in particularly well on cold nights – but for the cost of a few hours and a trip to the hardware store, a hoop house will extend your growing season significantly. It’s also easy to disassemble and store during summer if you don’t need it year-round.
3. Lean-To Greenhouse
If your yard is tight, a lean-to might be the only greenhouse that actually fits. It attaches directly to an existing wall – usually the south- or west-facing side of a house, garage, or fence – which does two useful things: it cuts your building costs roughly in half since you only need three walls and a roof, and it means your structure stays warmer because the building behind it retains heat overnight.
Lean-to greenhouses attach to existing buildings, saving both space and cost, though they may be limited in size depending on the available wall. The access to utilities is another real advantage – running electricity for a grow light or a small heater is dramatically simpler when you’re already attached to a structure that has power.
A lean-to built with salvaged windows is one of the most satisfying builds in this whole list. Prefabricated greenhouses can cost thousands of dollars, especially with heavy glass panels or professional construction, but a lean-to made with old windows collected from neighborhood groups, salvage yards, or renovation projects can come together for almost nothing. The aesthetic tends toward something lovely and a little eccentric – mismatched panes, wooden frames with a few coats of paint, morning light coming through at every angle.
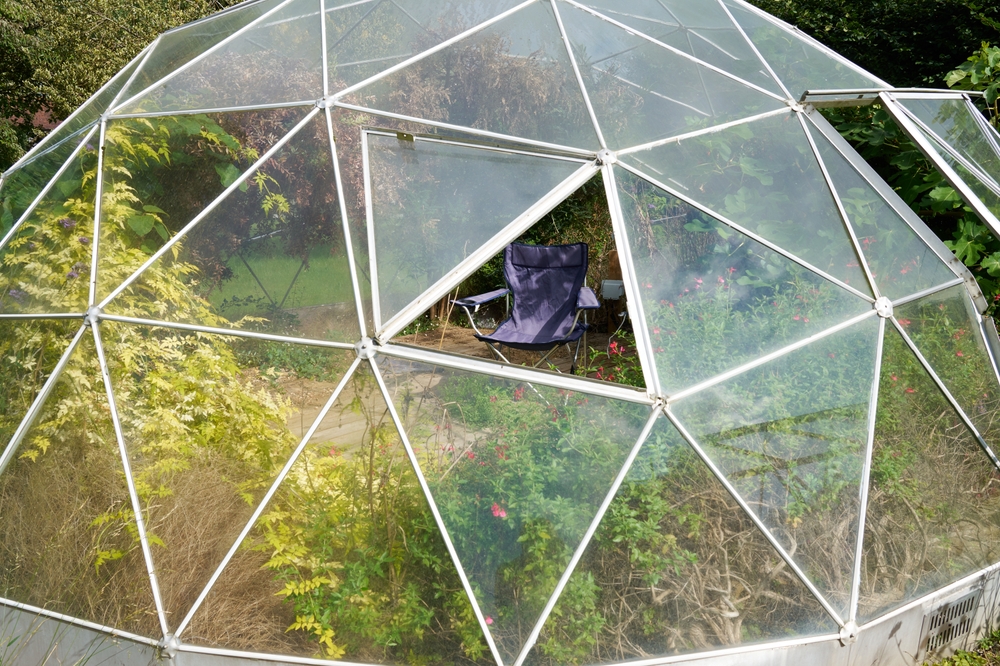
4. Geodesic Dome Greenhouse
The geodesic dome looks like the most complicated structure on this list. In practice, it’s one of the most structurally sound options you can build, and it’s more forgiving than you’d expect once you understand the geometry. The strength of a geodesic dome comes from its triangular frame, which distributes weight equally throughout the structure so no internal supports are needed.
A well-constructed gothic-arch or dome greenhouse typically handles snow loads of 30 to 40 pounds per square foot, and the steep pitch naturally encourages snow to slide off rather than accumulate. The spherical shape of the dome also distributes wind load evenly across the structure, providing inherent stability in heavy weather. For anyone gardening in a climate that gets serious snow or storms, that structural resilience is a meaningful advantage over a conventional rectangular greenhouse.
The dome’s multifaceted surface captures sunlight from a wide range of angles throughout the day, and because a greenhouse extends the growing season and provides plants with a lot more heat, you can grow ripe tomatoes in cold climates and cultivate plants that simply wouldn’t survive outside. The space also makes a great place to sit on cool spring days. For the dome itself, Northern Homestead has published detailed plans based on their own 18-foot build in a cold northern climate, including notes on the specific strut adjustments that most online plans get wrong. Build a “pony wall” – a short vertical base wall – first, and you’ll have better headroom and a more even base to work from.
5. Reclaimed Window Greenhouse
This is the one that stops people scrolling. A greenhouse built entirely from old wooden windows looks like something from a movie set – the kind of garden building where you’d expect to find antique seed catalogues and a pot of tea. The reality is that it’s one of the more practical builds too, since old windows are often thicker and better insulated than modern panes.
The key with a reclaimed window build is to collect your windows first, then design the structure around them rather than the other way around. Trying to find windows that fit a pre-designed frame is a headache you don’t need. Clever passive-heating additions – like dark-painted jugs filled with water placed along the north wall – can help stabilize overnight temperatures without any added cost.
The frame itself is typically cedar 2x4s or 2x6s, built to match whatever window sizes you’ve accumulated. A mix of single and double-hung windows means you can open several panels for ventilation during hot months – which matters, because overheating is one of the most common reasons greenhouse plants die. If you’re looking for unusual plants worth growing once your greenhouse is up and running, these rare herbs are worth considering for your first season.
6. Gothic Arch Greenhouse
The gothic arch – a pointed rather than rounded curve – has become the design of choice for serious growers in northern climates. Most well-built gothic arch greenhouses are engineered for snow loads between 20 and 40 pounds per square foot, and the steep pitch means most of that snow slides off on its own rather than sitting and accumulating weight. That’s not a small thing. A flat or gently curved roof can collapse under serious snowfall; the gothic arch sheds it naturally.
The shape also looks striking in a garden. From the outside it reads as intentional and slightly dramatic – closer to a chapel than a garden shed. The building method is similar to a hoop house but uses conduit or heavier metal bends to achieve the steeper point, and the covering is typically UV-resistant greenhouse plastic stretched tight over the frame.
A practical note for anyone planning a gothic arch: the curved design can present some challenges for traditional shelving installation, so the curved sides mean less vertical wall space than a traditional gable-roof structure. Plan your interior layout before you build, not after. Most people end up wanting more shelf space than they initially thought, and it’s much easier to add that during construction than to retrofit it later.
7. Cold Frame Greenhouse
A cold frame is where most gardeners should start. It’s not really a greenhouse in the traditional sense – more of a bottomless box with a transparent lid – but it does the same core job: it creates a microclimate that’s warmer than the surrounding air, giving you an extra few weeks at both ends of the growing season.
Cold frame plans are a practical and charming addition to any garden, ideal for early planting and year-round growing. The simplest versions are made from old wooden boards or even straw bales as sides, with an old window frame laid on top as the glazed lid. You prop the lid open on warm days for ventilation and close it at night to trap heat. That’s essentially the whole system.
The bigger builds – proper cold frames with hinged insulated lids, multiple compartments, and timber frames – can protect plants down to surprisingly low temperatures without any added heat source. Using small inner hoop covers made of concrete reinforcing wire inside a cold frame and covering beds at night with old blankets, it’s possible to grow spinach, kale, and other leafy greens all the way through the coldest winters in zone 5 with no extra heating. For growers in cold zones 5 through 7, prioritizing higher R-values in glazing and wall materials pays off in noticeably better heat retention. If you’ve never grown anything before and want to test the concept before committing to a full structure, start here.
8. Mini Tabletop Greenhouse
Not everyone has a yard, and a mini tabletop greenhouse is a legitimate option for balconies, patios, or even indoor windowsills. The principles are the same as a full-size build – a transparent enclosure that traps warmth and humidity – just scaled down to something you can pick up and move.
You can build a miniature greenhouse version yourself, and it lets you enjoy all the benefits of greenhouse growing even with limited space, while saving money compared to buying a pre-built larger greenhouse. Old picture frames with clear acrylic panels make excellent small cold frames. A clear plastic storage bin with the lid used as a base creates a surprisingly functional propagation environment. Even an old glass aquarium turned on its side and fitted with a simple cover works well for seedlings.
The main things to watch with small enclosures are ventilation and overheating. The basic elements of a greenhouse are simple – it can be large or contain fancy equipment, but it can also just be a structure with four sides and a top, and using scraps to build a very basic greenhouse for starting seeds or keeping tender plants warm is entirely achievable. On sunny days, a small enclosed space can hit temperatures that would cook a seedling within an hour. A slight prop or a ventilation hole makes all the difference.
9. Pyramid Greenhouse
The pyramid greenhouse is an unusual choice – and that’s partly what makes it so appealing. Four slanted triangular walls rising to a central peak create a structure that looks like it belongs in a botanical garden, but can be built with cut timber and polycarbonate panels over a weekend.
You can build a 15-foot by 15-foot pyramid greenhouse with a standard downloadable PDF plan, and the four slanted walls flood plants with sunlight for growth regardless of the outdoor temperature. The pyramid shape also means the structure handles wind loads from any direction reasonably well – the geometry distributes force much like a dome does, just in a simpler form.
Interior space is the trade-off. Because the walls lean inward, you lose headroom toward the edges, and the usable planting area concentrates toward the center. This makes pyramid greenhouses ideal for a mix of tall plants in the middle (tomatoes, peppers, climbing beans) and low trays of seedlings or herbs around the perimeter. The visual effect of plants growing up toward a glass apex is something people tend to love once they see it in person.
10. Converted Shed Greenhouse
If you already have a garden shed that’s seen better days – or you can pick up an old one cheaply – converting it into a greenhouse is one of the most cost-effective projects on this list. The structure is already there; you’re essentially replacing the walls or roof with transparent panels and making a few adjustments for ventilation.
Depending on the panel thickness, polycarbonate can reduce heat loss by 40 to 65 percent compared to single-pane glass, which makes it the smarter choice for a shed conversion. It’s also lighter and easier to cut than glass, and won’t shatter if a panel falls during installation. You can replace individual wall sections while leaving the wooden frame intact, which keeps the project manageable.
The things to sort out in a shed conversion are ventilation and flooring. Sheds tend to have solid floors and small openings, neither of which suits plants well. Adding roof vents and replacing the floor with gravel or pavers on top of landscape fabric (which lets water drain while blocking weeds) will make the space genuinely usable. A shed that gets converted properly will outlast most purpose-built backyard greenhouses by years.
11. Attached Sunroom Greenhouse
An attached sunroom greenhouse is the most ambitious option on this list and the most rewarding if you get it right. This is a permanent structure built against the side of your home – larger than a lean-to, with its own foundation, proper glazing, and often a tiled or stone floor that acts as thermal mass (a heat-storage layer that soaks up warmth during the day and releases it at night).
Always check with your local building department before starting, as townships typically require a permit for structures larger than 200 square feet, though smaller greenhouses may not trigger that threshold. An attached sunroom will almost certainly require a permit, and in some areas, specific setback requirements from property lines. Getting this sorted before you pour a foundation is not optional.
The payoff is a space that functions as both greenhouse and living area. Morning coffee among plants. A potting bench next to a comfortable chair. The kind of room that makes winter feel more bearable than it has any right to be. It’s also, practically speaking, the most energy-efficient greenhouse you can build – shared walls with the house mean dramatically lower heating costs in cold months.
12. Polytunnel Greenhouse
A polytunnel is what a hoop house becomes when you want something more permanent and more spacious. The structure uses metal hoops (typically steel or galvanized conduit) rather than PVC, spans larger widths – sometimes up to 20 or 30 feet – and is covered with a single continuous sheet of UV-stabilized polyethylene film that’s tensioned and anchored at the base.
Polycarbonate provides up to 60% better thermal insulation than greenhouse glass, is nearly impossible to break, and its flexibility makes it builder-friendly at lower cost. But for sheer value per square foot of growing space, a polytunnel is hard to beat. Commercial growers use them for exactly that reason.
For home gardeners, a 10-by-20-foot polytunnel gives you more usable space than almost any other DIY option at the same cost. The plastic film covering typically lasts four to six years before it needs replacing, at which point you simply re-cover the same frame. Orient the tunnel running north to south if possible, which ensures both sides get roughly equal sun exposure throughout the day, and install ventilation doors at both ends so air can move through on warm days.
13. Pallet Wood Greenhouse
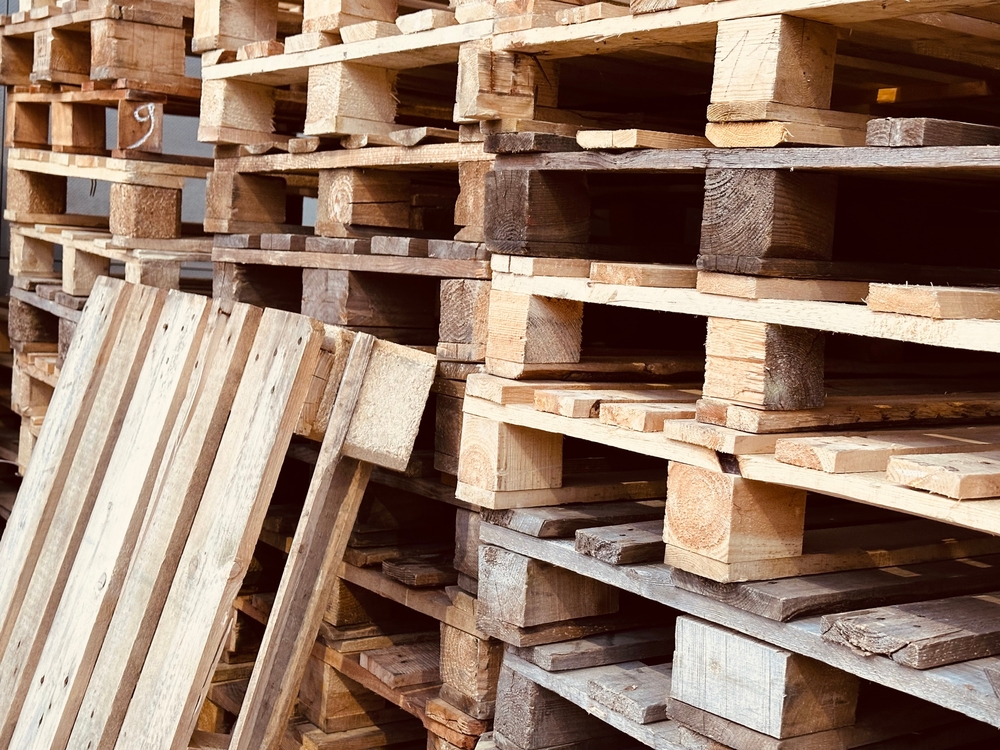
Building with pallets is one of those ideas that sounds like it should be complicated and turns out to be surprisingly straightforward. Standard pallets are already structural – they’re designed to carry weight – and their open slatted frames can be filled with clear corrugated plastic or polycarbonate sheeting to create walls that let light in while providing solid insulation.
Repurposing old windows, doors, or pallets instead of buying new materials is one of the most sustainable options for a DIY greenhouse build. The pallets themselves are often free or very cheap from local businesses, garden centers, or shipping companies. Before using any pallet, check for the IPPC stamp: HT means heat-treated and safe to use; MB (methyl bromide) means chemically treated and should be avoided around food crops.
The resulting structure has a rustic, purposeful look that sits naturally in a kitchen garden setting. Line the interior walls with plastic sheeting for additional insulation in winter, add a simple hinged door made from a cut pallet, and lay gravel on the floor. The whole thing can come together in a weekend and cost very little beyond the corrugated panels. Growing food and producing goods locally reduces the need for transportation and lowers your carbon footprint – a pallet greenhouse is about as local as food production gets.
14. Cedar and Polycarbonate Greenhouse
This is the design people post on home improvement forums and someone always asks “where did you buy that?” It’s built from scratch, but it looks considered and permanent – the kind of greenhouse that makes the whole garden look better.
Compared to single-wall polycarbonate, twin-wall polycarbonate provides up to 50% savings in heating costs, and the lighter weight simplifies installation significantly. Cedar is the ideal pairing because it’s naturally rot-resistant, handles outdoor moisture well without needing chemical treatment, and weathers to a beautiful silver-grey over time if you leave it unfinished.
The build itself follows standard post-and-beam framing: a pressure-treated base plate, cedar studs at regular intervals, a ridge beam running the length of the roof, and rafters angled to whatever pitch you want. Location selection critically impacts performance – sunlight is the primary factor, and experts recommend orienting the greenhouse to maximize daily sunlight exposure, with research indicating that an east-west orientation can increase internal winter temperatures compared to north-south alignment. Get the orientation right before you set the posts and the rest of the build will thank you for it.
15. Aquaponics Greenhouse
An aquaponics greenhouse combines fish tanks with plant growing beds in a closed-loop system where the fish waste feeds the plants and the plants filter the water back to the fish. It sounds elaborate, and the initial setup is more involved than a standard greenhouse, but it produces food year-round from a relatively small footprint and almost no external inputs.
The greenhouse structure can be any of the designs already mentioned – a standard A-frame or polycarbonate build works fine. The aquaponics system inside consists of a fish tank, a grow bed filled with gravel or expanded clay pellets (where plant roots can anchor), a water pump, and basic plumbing connecting the two. Tilapia and trout are the most commonly used fish in home systems; leafy greens, herbs, and tomatoes do best in the grow beds.
Herbs and leafy greens are an excellent choice to grow in the greenhouse especially during cooler weather, and tomatoes and peppers thrive as greenhouse crops during summer months. The combination of fish and plant growing in the same structure means you’re essentially running two food systems in the footprint of one. It’s the most productive greenhouse per square foot on this list, though it rewards people who like managing systems as much as they like growing things.
16. Straw Bale Greenhouse
Straw bale construction has been used in home building for well over a century, and in a greenhouse context it offers something unusual: walls that are both load-bearing and heavily insulated, built from a material that costs almost nothing and requires no specialized tools to work with.
The basic straw bale greenhouse involves stacking bales to form three solid walls, with a transparent south-facing wall (typically polycarbonate or clear corrugated sheeting on a simple timber frame) and a transparent roof. The straw acts as exceptional insulation. Proper insulation keeps temperatures more balanced and helps reduce the cost of heating and cooling – with R-value being the standard measure of resistance to heat flow. Straw bale walls typically provide R-values between 25 and 35, roughly three times better than a standard wood-framed wall, which translates to dramatically lower heating costs in cold months.
You can use straw bales as a building material that needs no specialized tools, which is part of what makes this design genuinely beginner-friendly – there’s no cutting, no joinery, no structural calculations. Stack, anchor, and roof. The bales will typically last 20 to 30 years if they stay dry, so a properly built straw bale greenhouse is a long-term investment rather than a seasonal fix.
17. Underground Walipini Greenhouse
The walipini is the least conventional design on this list, and probably the most effective for growing through serious winters. Instead of building upward, you build down – excavating a pit roughly three to four feet deep, lining the walls with earthbags or timber, and covering the top with a transparent roof that sits just above grade level.
The ground itself acts as a thermal battery. At a depth of three to four feet, soil temperature in most climates remains between 50 and 60°F year-round, regardless of what’s happening on the surface. That constant baseline warmth means you can grow through hard winters without any supplemental heating at all in many climates.
A flat area ensures proper drainage, while proximity to water and electricity simplifies plant care – both of which matter especially with an underground structure, where drainage needs to be planned rather than assumed. The primary design note for a walipini is slope: orient the transparent roof at the same angle as your latitude to catch the maximum winter sun. The north wall is typically built taller than the south wall to create that slope and reflect additional light down onto the beds.
18. Glass Bottle Greenhouse
A glass bottle greenhouse is exactly what it sounds like: walls built from empty glass bottles set in mortar or clay, creating a structure that’s part building, part art installation. Old glass bottles work as passive heating elements in a DIY greenhouse – they trap small pockets of air and diffuse light in a way that scatters color across the interior on sunny days.
The building method is similar to brick laying. Bottles are placed in rows, either neck-out or base-out, and set in a mortar mix. Green and brown glass transmits less light, so clear bottles (or a mix of clear with occasional colored ones for effect) tend to work better as the primary material. The thermal mass of the glass and mortar walls helps moderate temperature swings – warming up slowly during the day and releasing heat gradually overnight.
This is a slow build – collecting enough bottles takes time, and laying them is unhurried, meditative work. But the result is unlike anything else in a garden, and structurally sound once the mortar cures. It’s worth pairing with a polycarbonate or glass roof rather than a plastic one; the walls are too beautiful to pair with a covering that’ll yellow in a few years.
19. Tiered Raised Bed Greenhouse
The final idea is less about structure and more about integrating two things that most gardeners want anyway: raised beds and weather protection. A tiered raised bed greenhouse is essentially a series of stepped or stacked growing beds inside a simple transparent structure, designed to maximize growing area in a small footprint by going upward instead of outward.
The frame is typically a basic A-frame or gothic arch, built to cover two or three tiered beds that rise from front to back. Planning for one to two square feet of space per plant allows for healthy growth, and a tiered layout essentially doubles or triples your growing area compared to a flat-floor structure of the same size. Lower tiers stay cooler and wetter – good for lettuce, spinach, and herbs. Higher tiers get more heat and light – ideal for tomatoes and peppers.
Homegrown food is often fresher and more nutritious than commercially grown produce, and growing your own vegetables and fruits means you can do it organically and ethically. A tiered raised bed setup takes that principle further by making sure every inch of the structure is planted. It’s the right design for people with small yards who want the maximum return from a greenhouse build, and it’s also one of the most visually satisfying when everything is in full growth.
Read More: Why Are Millennials Embracing Homesteading?
Before You Build, One Thing Worth Knowing
The single most common greenhouse mistake isn’t structural – it’s placement. Location selection critically impacts performance, and sunlight is the primary factor: experts recommend orienting the greenhouse to maximize daily sunlight exposure, which in most of the Northern Hemisphere means maximizing southern exposure. A greenhouse in the wrong spot – shaded by a fence, a tree, or the house itself for half the day – will underperform no matter how well it’s built. Walk your intended site at different times of day across different seasons before you commit to a location.
The other thing worth saying: don’t over-engineer your first build. Builders often regret not constructing a larger structure – but when you’re uncertain about size, erring toward bigger dimensions makes sense within reason. Start with something you can actually finish. A completed cold frame beats a half-built cedar showpiece sitting in pieces all winter.
There’s something genuinely satisfying about a greenhouse you built yourself – watching the first seedlings come up in February, or picking tomatoes when your neighbors have packed away their gardens entirely. That satisfaction is available at every budget level and every skill level on this list. The structure doesn’t have to be perfect. It just has to be standing, and yours.
AI Disclaimer: This article was created with the assistance of AI tools and reviewed by a human editor.